Dark and moody food photography is one of the most striking visual styles in food imagery today. Defined by deep shadows, rich tones, and dramatic contrast, this aesthetic transforms everyday dishes into works of art that feel like they belong in a fine dining restaurant or a Renaissance painting. It is a style that commands attention, evokes emotion, and makes viewers feel the warmth, richness, and indulgence of the food in the frame.
The dark and moody trend has surged in popularity across social media, food magazines, and restaurant branding. Instagram feeds filled with dramatic, shadow-heavy food images consistently outperform brighter counterparts in engagement. Restaurants and food brands are increasingly choosing this style for their menus and marketing because it communicates sophistication, craftsmanship, and quality without saying a word.
But achieving this look requires more than just turning down the brightness. It demands intentional choices in lighting, props, surfaces, composition, and post-processing. This guide walks you through every element of the dark and moody style so you can master it -- whether you are shooting with a professional camera or a smartphone.
Understanding the Dark & Moody Style
The dark and moody aesthetic in food photography draws its roots from chiaroscuro, the painting technique mastered by artists like Caravaggio and Rembrandt. The word itself means "light-dark" in Italian, and the principle is simple: use strong contrasts between light and shadow to create depth, volume, and drama.
In food photography, this translates to images where the background fades into deep shadow, the light falls selectively on the food, and the overall palette is dominated by dark, warm tones. The key characteristics include:
- Low-key lighting: The majority of the frame is dark, with light illuminating only the subject and selected elements.
- Deep shadows: Shadows are intentional and pronounced, adding mystery and depth rather than being corrected away.
- Warm, muted color palette: Colors tend toward earthy, warm tones -- deep browns, burgundies, burnt oranges, and muted greens.
- Textural emphasis: The interplay of light and shadow reveals and exaggerates texture in the food and props.
- Minimal, curated styling: Dark compositions favor simplicity and intentionality over abundance.
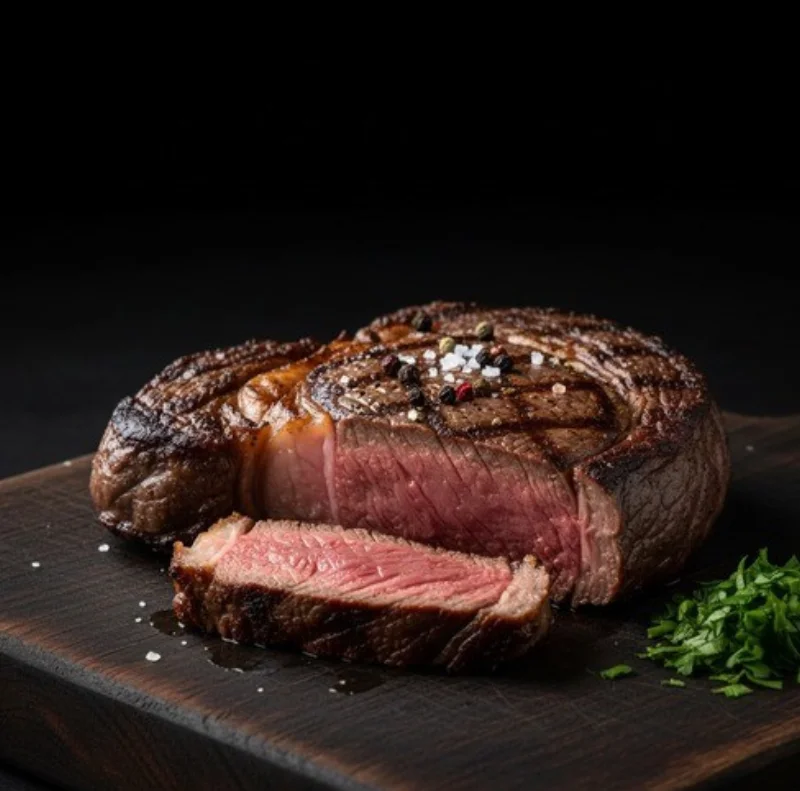
This style works exceptionally well for certain types of food. Rich, hearty dishes are natural fits: think seared steaks with a glistening crust, molten chocolate lava cake, red wine in a crystal glass, freshly baked sourdough with a crackled crust, steaming bowls of beef stew, espresso with golden crema, and roasted root vegetables with caramelized edges. These foods have the textures, tones, and visual weight to stand up to dramatic lighting and dark environments.
Lighting Setup for Dark Photography
Lighting is the single most important element in dark and moody food photography. Everything else -- props, backgrounds, editing -- supports and enhances what the light is doing. The fundamental principle is simple: control the light so it hits only where you want it, and let everything else fall into shadow. For a deeper dive into lighting fundamentals, see our food photography lighting guide.
Single Light Source
The foundation of dark and moody photography is using a single light source. Whether it is a window, a studio strobe, or even a desk lamp, one light creates the directional shadows that define this style. Multiple lights fill in shadows and flatten the image, which is the opposite of what you want. One light, positioned deliberately, gives you the drama and depth that make dark food photography so compelling.
Side Lighting
Side lighting -- placing your light source at roughly 90 degrees to the camera -- is the most popular setup for dark food photography. It creates a beautiful gradient across the food, with the lit side showing detail and color while the opposite side falls into rich shadow. Side lighting is particularly effective for dishes with height and texture, as it reveals every ridge, drip, and surface detail. Position the light slightly behind the subject (about 8 o'clock or 4 o'clock position relative to camera at 6 o'clock) for the most dramatic effect.
Backlighting
Backlighting places the light source behind the food, facing toward the camera. This creates a rim of light along the edges of the subject -- a halo effect that separates the food from the dark background and creates a sense of luminosity. Backlighting is especially effective for translucent foods and liquids: honey dripping from a spoon, steam rising from a cup of coffee, or wine catching the light in a glass. It creates an ethereal, almost mystical quality that is unmistakably moody.
Flagging and Blocking Light
Flagging is the technique that truly separates amateur dark photography from professional results. A flag is anything that blocks light from reaching areas you want to keep dark -- black foam board, black cardboard, or even a dark towel. Place flags on the side of your subject opposite the light to prevent light from bouncing back and filling in your shadows. Use flags above the set to keep light off the background. The more precisely you control where light does and does not fall, the more dramatic and intentional your images will look. Two or three black foam boards (available at any craft store for a few dollars) can completely transform your results.
Choosing the Right Props & Surfaces
In dark and moody food photography, every element in the frame needs to support the atmosphere. Bright, glossy, or colorful props will fight the mood you are trying to create. Instead, choose props that absorb light, show age and character, and blend harmoniously into the shadows. Here are the materials that work best:
- Dark wood: Weathered, rustic wood surfaces and cutting boards in walnut, dark oak, or reclaimed barn wood add warmth and organic texture. They photograph beautifully in low light and complement virtually any food.
- Slate and stone: Slate boards, natural stone slabs, and dark marble create elegant, weighty surfaces that anchor the composition. Their subtle texture catches the light in interesting ways without competing with the food.
- Cast iron: Skillets, Dutch ovens, and cast iron plates are iconic in dark food photography. Their matte black surfaces absorb light perfectly, and they add a sense of rustic authenticity and warmth to any scene.
- Matte ceramics: Choose plates, bowls, and mugs with matte or satin finishes in dark tones -- charcoal, deep navy, forest green, or matte black. Avoid high-gloss white ceramics, which create distracting bright spots in a dark scene.
- Linen napkins and textiles: Dark, rumpled linen in charcoal, natural brown, or deep burgundy adds softness and visual texture to the composition. Drape them casually beside the plate or underneath for a relaxed, organic feel.
- Vintage utensils: Aged, tarnished, or patinated cutlery and serving utensils add character and tell a story. The imperfections catch light in subtle, interesting ways that polished modern silverware cannot match.
Background Selection
The background in dark food photography should recede and support, never compete with the food. The ideal background absorbs most of the light that hits it and provides just enough texture to add visual interest without distraction. Here are the most effective options:
- Dark painted boards: Plywood or MDF boards painted with matte black, dark grey, or deep brown chalk paint are the most popular and versatile backgrounds. You can create your own in an afternoon for under $20, and they provide a perfectly dark, subtly textured surface that works with almost any dish.
- Natural stone: Dark granite, soapstone, or basalt surfaces offer authentic texture and visual depth. They are heavier and more expensive than painted boards, but the results are strikingly real and cannot be replicated with paint alone.
- Concrete: Poured concrete or concrete-effect surfaces in dark grey tones bring an industrial, modern edge to dark food photography. The subtle variations in tone and texture add visual interest while staying firmly in the dark palette.
- Dark fabric: Black or dark charcoal canvas, velvet, or heavy linen draped behind or beneath the set creates a seamless, shadow-rich background. Fabric backgrounds work especially well when you want the background to completely disappear into blackness.
A practical tip: you do not need to spend hundreds on backgrounds. Two or three dark painted boards and a piece of black fabric will cover 90% of your dark food photography needs. Focus your investment on lighting control first and backgrounds second.
Camera Settings for Low-Key Photography
Getting the right exposure is critical for dark and moody images. You want to deliberately underexpose compared to what your camera's meter suggests, creating the low-key look that defines this style. Here are the key settings to master:
- Shoot in manual mode: Auto exposure will try to brighten the scene, fighting against the dark look you are creating. Manual mode gives you full control over how dark or light the image appears.
- Keep ISO low: Use ISO 100-400 to maintain clean, noise-free shadows. Dark areas of an image are the first to show noise, so keeping the ISO low is especially important in dark photography.
- Use a wide aperture for selective focus: Apertures between f/2.8 and f/4 create a shallow depth of field that isolates the food from the dark background, adding to the atmospheric quality. The out-of-focus areas blend beautifully into the shadows.
- Adjust shutter speed for exposure: Use the shutter speed as your primary exposure control. A faster shutter speed will darken the overall image. Start at what the meter suggests, then increase the shutter speed by 1-2 stops to achieve the dark, moody look.
- Expose for the highlights: Set your exposure so the brightest part of the food is properly exposed. Let the shadows fall as dark as they naturally want to go. This preserves detail where it matters and creates the contrast that defines the style.
- Use a tripod: In low-light situations, a tripod lets you use slower shutter speeds without motion blur, giving you maximum flexibility with ISO and aperture choices.
If you are shooting with a smartphone, use the pro/manual mode available on most modern phones. Lock the exposure on the brightest part of the food by tapping and holding, then manually drag the exposure slider down to darken the overall scene.
Food Styling for Dark Compositions
Food styling for dark and moody photography follows different rules than styling for bright, airy images. The goal is to create visual richness and highlight the sensory qualities of the food -- warmth, texture, indulgence -- rather than showcasing freshness and lightness. Here are the key techniques:
Rich Sauces and Glazes
Dark food photography thrives on shine and sheen. Drizzle rich sauces, reductions, or glazes on and around the dish to catch the light. A glossy balsamic reduction over a steak, melted butter pooling on a bread roll, or chocolate ganache dripping down the side of a cake all create luminous highlights that pop against the dark surroundings. These wet, reflective elements are your highlights -- they are what draws the viewer's eye through the image.
Garnishes That Pop
In a dark scene, even a small garnish can become a powerful focal point. Fresh herbs like rosemary, thyme, or sage add tiny pops of green that feel alive against the dark palette. A sprinkle of flaky sea salt catches the light like tiny crystals. A dusting of powdered sugar on a chocolate dessert creates a beautiful contrast. Red chili flakes, edible flowers in deep tones, or a scattering of pomegranate seeds can introduce just enough color to make the composition feel dynamic without breaking the mood.
Steam and Smoke Effects
Nothing says "dark and moody" like wisps of steam or smoke curling through the frame. Steam rising from a hot dish, smoke from a just-extinguished candle, or the vapor coming off freshly brewed coffee creates an ethereal, atmospheric quality that is impossible to achieve any other way. In backlit or side-lit setups, steam and smoke become visible and luminous, adding a layer of drama that elevates the entire image. To capture real steam, work fast with freshly cooked food and use backlighting to make the steam visible against the dark background.
Composition Techniques
Composition in dark food photography benefits from restraint and intentionality. With less visible in the frame, every element that the light reveals carries more visual weight. Here are the techniques that work best:
Rule of Thirds in Dark Scenes
The rule of thirds is even more powerful in dark photography because the negative space (shadows) naturally leads the eye toward the lit subject. Place your food at one of the intersection points of the thirds grid, letting the darkness fill the rest of the frame. This creates a sense of space and drama that centered compositions often lack. The dark negative space gives the food room to breathe and draws the viewer's focus exactly where you want it.
Leading Lines
In a dark scene, leading lines created by utensils, the edge of a cutting board, a drizzle of sauce, or the grain of wood guide the viewer's eye through the image and toward the food. Because so much of the frame is in shadow, these visible lines become even more prominent and effective. A knife angled toward the dish, a line of crumbs, or the curve of a napkin edge can all serve as subtle leading lines.
Embrace Minimalism
Dark and moody photography rewards minimalism. Resist the temptation to fill the frame with props and supporting elements. One dish, one utensil, one complementary element -- that is often enough. The darkness itself becomes a compositional element, creating the negative space that gives the food visual impact. Some of the most powerful dark food images feature a single subject emerging from almost complete blackness.
Editing Dark Food Photos
Post-processing is where you refine and intensify the dark and moody look. Even with perfect lighting and styling, editing is essential to bring out the full potential of your dark food images. Here are the key editing techniques, and for a comprehensive guide to food photo editing, see our food photography editing guide.
Bringing Out Highlights
In dark food photography, your highlights are precious -- they are where the food comes alive. Selectively boost the highlights on the food itself to make it glow against the dark surroundings. Use local adjustment tools (radial filters, brushes) to brighten just the food and key props, keeping the background and shadows dark. The contrast between bright food and dark environment is what creates the dramatic impact of the style.
Crushing the Blacks
Crushing the blacks means deepening the darkest tones in the image so they become pure or near-pure black. Pull the blacks slider down in Lightroom or Camera Raw to deepen shadows and simplify the dark areas of the frame. This eliminates distracting detail in the background and reinforces the low-key look. Be intentional: you want the shadows deep and rich, but watch for banding or unnatural transitions between shadows and midtones.
Color Grading and Split Toning
Color grading is what gives dark food images their signature mood. Push the shadows toward cool blue or deep teal tones while keeping the highlights warm (amber, golden). This split toning creates a rich, cinematic quality that feels polished and intentional. Desaturate the overall image slightly, then selectively boost saturation in the warm tones of the food -- the golden browns of a crust, the deep red of a sauce, the amber of melted cheese. This keeps the food looking appetizing while maintaining the moody atmosphere everywhere else.
If manual editing feels overwhelming, AI tools like Platora can apply professional-grade dark and moody styling to your food photos automatically, handling the complex color grading and tonal adjustments with a single click.
When NOT to Use Dark & Moody Style
As powerful as the dark and moody style is, it is not the right choice for every subject. Understanding when to avoid this look is just as important as knowing how to execute it. Here are the situations where a brighter approach serves the food better:
- Fresh, colorful salads: Bright green salads, rainbow grain bowls, and vibrant fruit platters communicate freshness and health -- qualities that dark lighting can undermine. These dishes need bright, even light to let their colors shine.
- Breakfast and brunch dishes: Pancake stacks, acai bowls, sunny-side eggs, and fresh smoothies are associated with morning light and energy. Dark styling creates a disconnection between the food and the meal occasion it represents.
- Kids' menus and family-friendly food: Colorful, playful dishes intended for children or family dining look most appetizing in bright, cheerful settings. Dark and moody styling can make these feel inappropriate or uninviting for the target audience.
- Tropical and summer foods: Ice cream sundaes, poke bowls, tropical cocktails, and light seafood dishes are tied to sunny, warm associations. Dark photography can make them look heavy and out of context.
- Fast-casual and quick-service branding: Brands that emphasize speed, convenience, and accessibility typically need bright, clean imagery that feels approachable. Dark and moody styling can create a perception of exclusivity that contradicts the brand message.
The dark and moody style is a powerful tool in your visual toolbox, but it is just one tool. The best food photographers know when to use it and when a different approach will better serve the story the food is telling.
Conclusion
Dark and moody food photography is one of the most visually striking and emotionally powerful styles in food imagery. By mastering single-source lighting, choosing the right dark props and surfaces, keeping your compositions minimal, and refining your edits with intentional color grading, you can create images that stop viewers mid-scroll and make them feel the warmth and richness of every dish.
The beauty of this style is its accessibility. You do not need an expensive studio or thousands of dollars in equipment. A single light, a few dark surfaces, some black foam boards for flagging, and a thoughtful eye are enough to produce stunning, dramatic food photographs.
Whether you are a restaurant owner looking to elevate your menu imagery, a food blogger building a signature aesthetic, or a photographer expanding your portfolio, the dark and moody style offers a timeless, sophisticated look that never goes out of fashion. And if you want to achieve this dramatic style instantly, Platora can transform your food photos with professional dark and moody styling in seconds -- no lighting setup or editing expertise required.